

How to build Reddit's NFT Marketplace using Polygon and Paper 📄
Building Email login in NFT-Marketplace using Paper on Polygon


gm gm gm!!!
Indeed, in the current scenario, few NFT marketplaces cater to non-web3 users, primarily due to the poor User Experience (UX) they have to face.
A significant barrier to entry for these users is the complexity of the Web3 ecosystem, including the need to understand concepts such as wallets, private keys, and gas fees. Moreover, the onboarding process can be tedious and confusing, with users having to set up and manage wallets and acquire cryptocurrency to interact with the marketplace. To address these issues and make NFT marketplaces more accessible to non-web3 users, it's essential to focus on improving UX.
In this guide, you’ll learn how to create a marketplace on Polygon and make it easy for non-crypto natives to use the marketplace by allowing them to log in with their emails and transfer NFTs with a **single click.
Reddit’s success with NFTs so far
Reddit is perhaps the best example of a company that brought NFTs to the masses. So far, they’ve brought NFTs to 7+ million people.
Reddit’s avatars were a massive success, partly because most customers don’t even know they’re using NFTs. They think of them as digital collectibles.
Reddit made the experience of claiming (and now buying) NFTs seamless. Users don’t need to know anything about Metamask, don’t need to hold any crypto, and don’t need to worry about remembering their seed phrases.
If we want NFTs to reach even more people, we should learn from Reddit’s success: Making NFTs simple for non-crypto native users will increase adoption.
That’s why I’ve created this guide: anyone can easily copy what worked for Reddit—specifically offering email-based login and payments via credit card. We’ll be doing this using Polygon (great for low-cost transactions) and [Paper] (SDKs for NFT commerce).
Avoid using Metamask as the only wallet for your DApp
Here the main reasons why you should avoid betting on MetaMask alone:
Limited Web3 knowledge can make average users hesitant to use MetaMask.
Installing and connecting the wallet to your DApp may confuse many users.
Managing private keys can be complex, posing significant concerns for users and the product. Since there is no solution for recovering a private key once it is lost or stolen, this presents a considerable issue.
Reasons for bad UX in most DApps
Every DApp aims to achieve decentralization to harness blockchain technology's potential fully. To do so, they often rely on traditional wallets that offer security and decentralization. However, like the Blockchain Trilemma, these DApps may need help with scalability.
For users who manage to create a wallet and store their private keys "safely," the next challenge arises when dealing with funds. Users must on-ramp crypto tokens and then spend them to interact with the DApp, significantly hindering new user onboarding.
Several other factors contribute to a poor user experience, such as needing to sign every interaction, always having the wallet accessible, and more. These issues can create an overall negative experience for users.
An alternative approach for login in DApps
Instead of relying on externally owned accounts (EOAs), developers can create smart contracts that act as user accounts and execute transactions on behalf of the user. This approach can improve user onboarding and the overall user experience of the DApp.
Several Ethereum improvement proposals (EIPs) try to define the concept of using smart contracts as wallets. After nine years of research, EIP-4337 was officially approved for account abstraction (AA).
AA offers customizable logic for wallet creation, transaction gas payment, and alternative tokens instead of Ether for gas fees. One such option is creating a wallet using an email address, where the user's email generates a private key. This key is then divided using cryptographic functions and shared between the user's device and the application service providers. The service provider can then pay for transaction gas, sign transactions, and assist users with private key recovery.
Paper's Solution to bad UX
The Paper offers an Embedded Wallet SDK that helps address user experience issues by providing the following features:
Create user wallets using email or social logins.
Sign messages or call blockchain methods without requiring prompts or gas fees.
Enable users to access or recover their wallets on any device.
Allow users to connect to other apps through WalletConnect.
Paper helps developers create seamless user experiences and scale their apps without setting up their own infrastructure.
Let's BUIDL (🧱,🚀) our own marketplace
Today, we will build an NFT marketplace to minimize friction for onboarding non-Web3 users. We'll achieve this by providing the option to create a wallet using any email and enabling gasless NFT transfers.
Functionalities
We will be implementing the following functionalities in our marketplace:
Email login for the DApp
Single click for buying and transferring the NFT.
Tech Stack
We build the marketplace with the following technologies:
React.js
Ethers.js
Paper's Embedded Wallet SDK
Prerequisites
NPM or Yarn installed in your system.
Basic understanding of React.js
Environment Setup
To set up the initial code (contract + UI) [Thanks to OMGWINNING for this], open your terminal in your preferred directory and enter the following commands:
git clone https://github.com/megabyte0x/NFT-Marketplace-Starter_Code.git

cd NFT-Marketplace-Starter_Code

npm install
Create a new file in the root directory named .env and paste the following content:
REACT_APP_ALCHEMY_API_URL="<Paste Alchemy URL HERE>"
REACT_APP_PRIVATE_KEY="<Paste your Private Key here>"
REACT_APP_PINATA_KEY="<Paste Pinata key here>"
REACT_APP_PINATA_SECRET="<Paste Pinata Secret key here>"
REACT_APP_PAPER_SECRET="<Paste Paper SDK secret key here>"
Obtain the required values by signing up on Alchemy, Pintata, and Paper.
npm install @paperxyz/embedded-wallet-service-sdk
Finally, start the development server with the following command:
npm start
Your development environment is now ready!
Initializing the Paper SDK
Create a file in the src folder named paper.js. This is where we will initialize the SDK.
Copy and paste the following code:
import { PaperEmbeddedWalletSdk } from "@paperxyz/embedded-wallet-service-sdk";

import { UserStatus } from "@paperxyz/embedded-wallet-service-sdk";

export const sdk = new PaperEmbeddedWalletSdk({
  clientId: process.env.REACT_APP_PAPER_SECRET,
  chain: "Mumbai",
});

export const socialLogin = async () => {
  try {
    await sdk.auth.loginWithPaperModal();
    return sdk.getUser();
  } catch (e) {
    console.log(e);
  }
}

export const socialLogout = async () => {
  try {
    await sdk.auth.logout();
  } catch (e) {
    console.log(e);
  }
}

export const getUser = async () => {
  const user = await sdk.getUser();
  return user;
}

export const getSigner = async () => {
  let signer;
  const user = await getUser();
  if (user.status === UserStatus.LOGGED_OUT) {
    return;
  }
  try {
    signer = await getUser().then((user) => {
      return user.wallet.getEthersJsSigner();
    });
  } catch (e) {
    console.log(e);
  }
  return signer;
}
sdkinitializes Paper's Embedded Wallet SDK by passing our Paper's Secret Key and the chain we will be using, "Mumbai".socialLoginis the function that opens the modal for social login using email.socialLogoutis the function to log out of the user.getUseris the function that retrieves information about the user, such as their wallet and wallet address.getSigneris a function that returns the Ethereum signer for signing transactions.
Now that we initialized our SDK, let's connect it to the rest of the code.
Enabling email login
Since Navbar is the component that will be helping us connect the wallet so, let's go to src/components/Navbar.js
Copy and paste this:
import { Link } from "react-router-dom";
import { useEffect, useState } from 'react';
import { useLocation } from 'react-router';

import { socialLogin, socialLogout, getUser } from "../paper.js";

import { UserStatus } from "@paperxyz/embedded-wallet-service-sdk";

function Navbar() {

  const [connected, toggleConnect] = useState(false);
  const location = useLocation();
  const [currentAddress, updateAddress] = useState('0x');
  const [currentUser, updateUser] = useState(null);

  function updateButton() {
    const ethereumButton = document.querySelector('.enableEthereumButton');
    ethereumButton.classList.remove("hover:bg-blue-70");
    ethereumButton.classList.remove("bg-blue-500");
    ethereumButton.classList.add("hover:bg-green-70");
    ethereumButton.classList.add("bg-green-500");
  }

  async function connectWithPaperWallet() {
    try {
      await socialLogin().then((user) => {
        if (UserStatus.LOGGED_IN_WALLET_INITIALIZED === user.status) {
          setUser();
        }
      });
    } catch (e) {
      console.log(e);
    }
  }

  async function logout() {
    try {
      await socialLogout().then(() => {
        setUser();
      });
    } catch (error) {
      console.log(error);
    };
  }

  async function setUser() {
    try {
      await getUser().then((user) => {
        if (user.status === UserStatus.LOGGED_OUT) {
          toggleConnect(false);
          updateUser(null);
          updateAddress('0x');
          return;
        }
        updateUser(user);
        updateAddress(user.walletAddress);
        toggleConnect(true);
        updateButton();
      })
    } catch (error) {
      console.error(error);
    }
  }

  useEffect(() => {
    setUser();
  }, [currentUser]);
}

export default Navbar;
Here, we've defined several state variables and a few functions to connect the wallet using Paper's SDK.
updateButton()updates the UI for the Connect Wallet button.connectWithPaperWallet()uses thesocialLoginfunction defined inpaper.jsto open a modal where users can sign in using their email. If the user signs in successfully, it will update the state ofcurrentUserandcurrentAddress.The
logout()function uses thesocialLogoutfunction defined inpaper.jsto log out of the current user. This ensures that when the user clicks the logout button, their session will be terminated, and their wallet will be disconnected from the DApp.Similarly, the
setUser()function is called whenever eitherconnectWithPaperWallet()orlogout()is called. This function sets the state variables such ascurrentUser,currentAddress, andconnected. It retrieves the latest user information and updates the state variables accordingly. This updates the UI with the user's connection status and ensures a smooth user experience.useEffectinitiates when thecurrentUserchanges, retrieving the latest changes in the user state and updating the state variables accordingly.
Next, let's create the returning component in this:
//....

  }, [currentUser]);

return (
    <div className="">
      <nav className="w-screen">
        <ul className='flex items-end justify-between py-3 bg-transparent text-white pr-5'>
          <li className='flex items-end ml-5 pb-2'>
            <Link to="/">
              <div className='inline-block font-bold text-xl ml-2'>
                NFT Marketplace
              </div>
            </Link>
          </li>
          <li className='w-2/6'>
            <ul className='lg:flex justify-between font-bold mr-10 text-lg'>
              {location.pathname === "/" ?
                <li className='border-b-2 hover:pb-0 p-2'>
                  <Link to="/">Marketplace</Link>
                </li>
                :
                <li className='hover:border-b-2 hover:pb-0 p-2'>
                  <Link to="/">Marketplace</Link>
                </li>
              }
              {location.pathname === "/sellNFT" ?
                <li className='border-b-2 hover:pb-0 p-2'>
                  <Link to="/sellNFT">List My NFT</Link>
                </li>
                :
                <li className='hover:border-b-2 hover:pb-0 p-2'>
                  <Link to="/sellNFT">List My NFT</Link>
                </li>
              }
              {location.pathname === "/profile" ?
                <li className='border-b-2 hover:pb-0 p-2'>
                  <Link to="/profile">Profile</Link>
                </li>
                :
                <li className='hover:border-b-2 hover:pb-0 p-2'>
                  <Link to="/profile">Profile</Link>
                </li>
              }
              <li>
                <button className="enableEthereumButton bg-blue-500 hover:bg-blue-700 text-white font-bold py-2 px-4 rounded text-sm" onClick={connectWithPaperWallet}>{connected ? "Connected" : "Connect Wallet"}</button>
              </li>
              <li>
                {connected && <button className="enableEthereumButton bg-blue-500 hover:bg-blue-700 text-white font-bold py-2 px-4 rounded text-sm" onClick={logout}>Logout</button>}
              </li>
            </ul>
          </li>
        </ul>
      </nav>
      <div className='text-white text-bold text-right mr-10 text-sm'>
        {currentAddress !== "0x" ? "Connected to" : "Not Connected. Please login to view NFTs"} {currentAddress !== "0x" ? currentAddress : ""}
      </div>
    </div>
  );
}

export default Navbar;
Here, we've created a basic Navbar to help navigate the "Marketplace", "List My NFT", and "Profile" pages. It also includes a dynamic Connect Wallet Button that will initiate the connectWithPaperWallet function and Logout Button that will trigger the logout function.

Single Click to buy and transfer the NFT
Let's move to the src/components/NFTPage.js file.
Copy and paste the below code:
import axios from "axios";
import { useParams } from 'react-router-dom';
import { useState } from "react";
import { ethers } from "ethers";

import Navbar from "./Navbar.js";

import { getSigner, getUser } from "../paper.js";

import MarketplaceJSON from "../Marketplace.json";

export default function NFTPage(props) {

    const [data, updateData] = useState({});
    const [dataFetched, updateDataFetched] = useState(false);
    const [message, updateMessage] = useState("");
    const [currAddress, updateCurrAddress] = useState("0x");
    const [recieverAddress, updateRecieverAddress] = useState("0x");

    async function getNFTData(tokenId) {
        const signer = await getSigner();
        const user = await getUser();

        const addr = await user.walletAddress;
        //Pull the deployed contract instance
        let contract = new ethers.Contract(MarketplaceJSON.address, MarketplaceJSON.abi, signer)
        //create an NFT Token
        const tokenURI = await contract.tokenURI(tokenId);
        const listedToken = await contract.getListedTokenForId(tokenId);
        let meta = await axios.get(tokenURI);
        meta = meta.data;

        let item = {
            price: meta.price,
            tokenId: tokenId,
            seller: listedToken.seller,
            owner: listedToken.owner,
            image: meta.image,
            name: meta.name,
            description: meta.description,
        }
        updateData(item);
        updateDataFetched(true);
        updateCurrAddress(addr);
    }

    async function buyNFT(tokenId) {
        try {
            const signer = await getSigner();

            updateMessage("Buying the NFT... Please Wait (Upto 1 min)")

            const funcInterface = new ethers.utils.Interface(["function executeSale(uint256 tokenId) public"]);
            const dataToSend = funcInterface.encodeFunctionData("executeSale", [tokenId]);

            let tx = {
                to: MarketplaceJSON.address,
                value: ethers.utils.parseEther(data.price),
                data: dataToSend
            };
            const txResponse = await signer.sendTransaction(tx);
            const txReceipt = await txResponse.wait();
            console.log("Transaction sent:", txReceipt.transactionHash);

            alert('You successfully bought the NFT!');
            updateMessage("");
        }
        catch (e) {
            alert("Upload Error" + e)
        }
    }

    async function transferNFT(tokenId) {
        try {

            const signer = await getSigner();

            //Pull the deployed contract instance
            let contract = new ethers.Contract(MarketplaceJSON.address, MarketplaceJSON.abi, signer);

            updateMessage("Transferring the NFT... Please Wait (Upto 1 min)")
            //run the executeSale function
            let transaction = await contract.transferNFT(tokenId, recieverAddress);
            await transaction.wait();

            alert('You successfully transferred the NFT!');
            updateMessage("");
        }
        catch (e) {
            alert("Upload Error" + e)
        }
    }

    const params = useParams();
    const tokenId = params.tokenId;
    if (!dataFetched)
        getNFTData(tokenId);
}
The NFTPage component is a separate page that includes two functions, one for buying NFTs and one for transferring NFTs. Let's understand how each function works in detail:
getNFTData(): This function fetches the data of a specific NFT using itstokenId.buyNFT(): This function transfers the NFT and price from the seller to the buyer. It uses the signer to make transactions and encodes the data for the contract.sendTransaction()(provided by Paper's Embedded Wallet SDK) initiates the transaction, which improves the UX, as users don't need to sign any transactions.transferNFT(): This function transfers the NFT. It brings in the signer and uses ethers.js for initiating transactions. By creating the instance of the contract with the signer and initiating the transaction using the traditional method with the contract, users can transfer NFTs with just a single click! All that is needed is to include Paper's Embedded Wallet SDK as a signer in the contract instance.
Next, let's create the component to return:
// ...
if (!dataFetched)
        getNFTData(tokenId);

return (
        <div style={{ "min-height": "100vh" }}>
            <Navbar></Navbar>
            <div className="flex ml-20 mt-20">
                <img src={data.image} alt="" className="w-2/5" />
                <div className="text-xl ml-20 space-y-8 text-white shadow-2xl rounded-lg border-2 p-5">
                    <div>
                        Name: {data.name}
                    </div>
                    <div>
                        Description: {data.description}
                    </div>
                    <div>
                        Price: <span className="">{data.price + " MATIC"}</span>
                    </div>
                    <div>
                        Owner: <span className="text-sm">{data.owner}</span>
                    </div>
                    <div>
                        Seller: <span className="text-sm">{data.seller}</span>
                    </div>
                    <div>
                        {currAddress === data.owner || currAddress === data.seller ?
                            <div className="text-emerald-700">
                                You are the owner of this NFT
                                <br></br>
                                <input type="text" placeholder="Enter the address of the buyer" className="bg-gray-800 text-white rounded-lg p-2 mt-2"
                                    onChange={(e) => updateRecieverAddress(e.target.value)}
                                ></input>
                                <button className="enableEthereumButton bg-blue-500 hover:bg-blue-700 text-white font-bold py-2 px-4 rounded text-sm" onClick={() => transferNFT(tokenId)}>Transfer this NFT
                                </button>
                            </div>


                            :
                            <button className="enableEthereumButton bg-blue-500 hover:bg-blue-700 text-white font-bold py-2 px-4 rounded text-sm" onClick={() => buyNFT(tokenId)}>Buy this NFT</button>

                        }

                        <div className="text-green text-center mt-3">{message}</div>
                    </div>
                </div>
            </div>
        </div>
    )
}
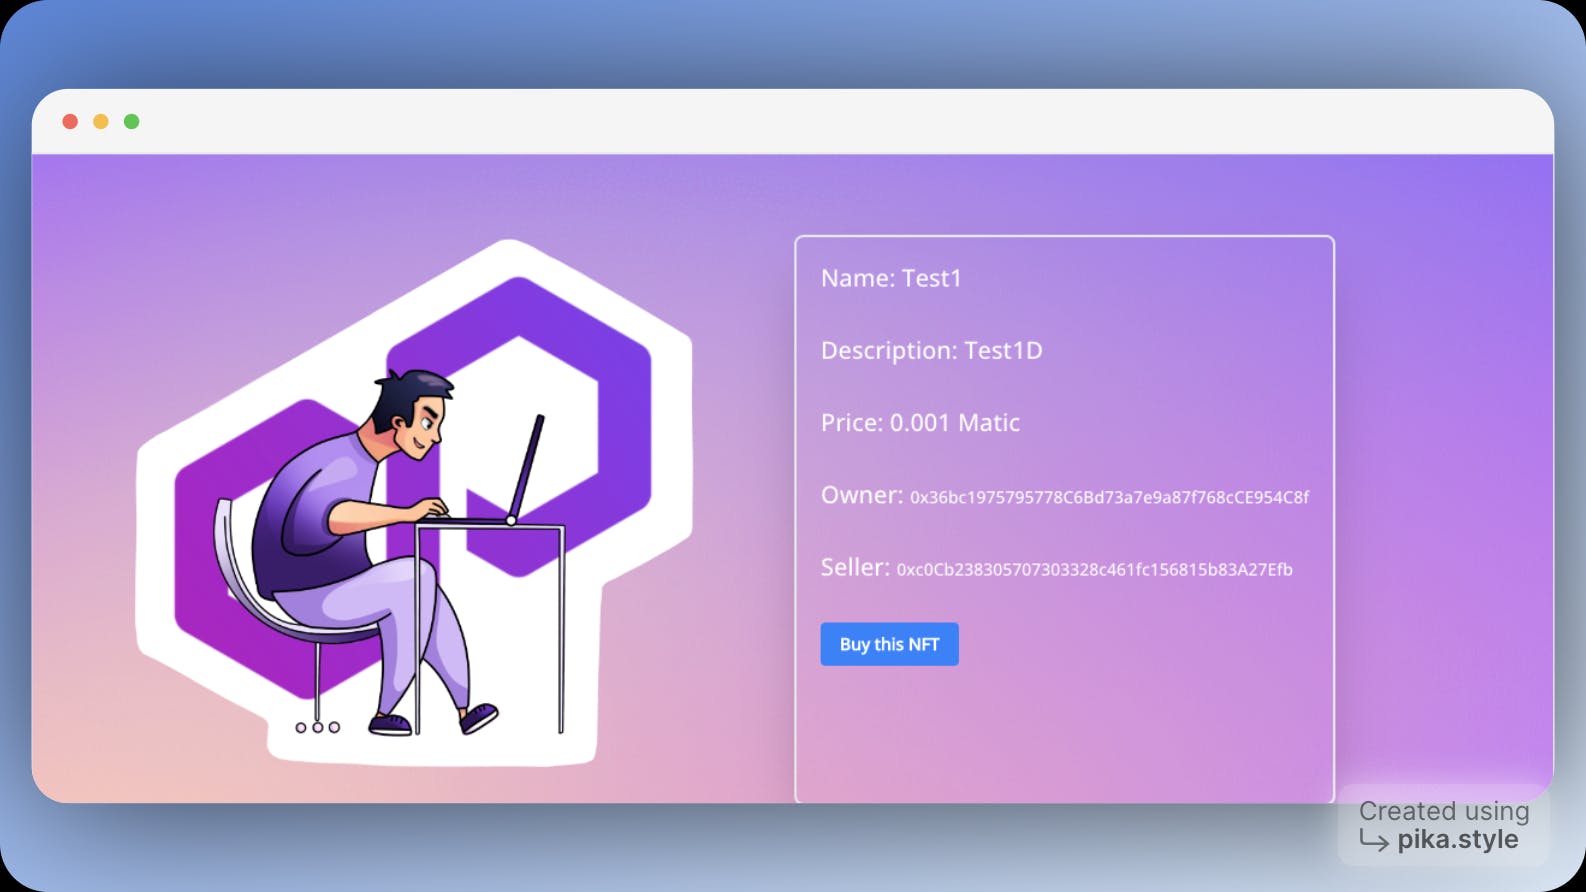
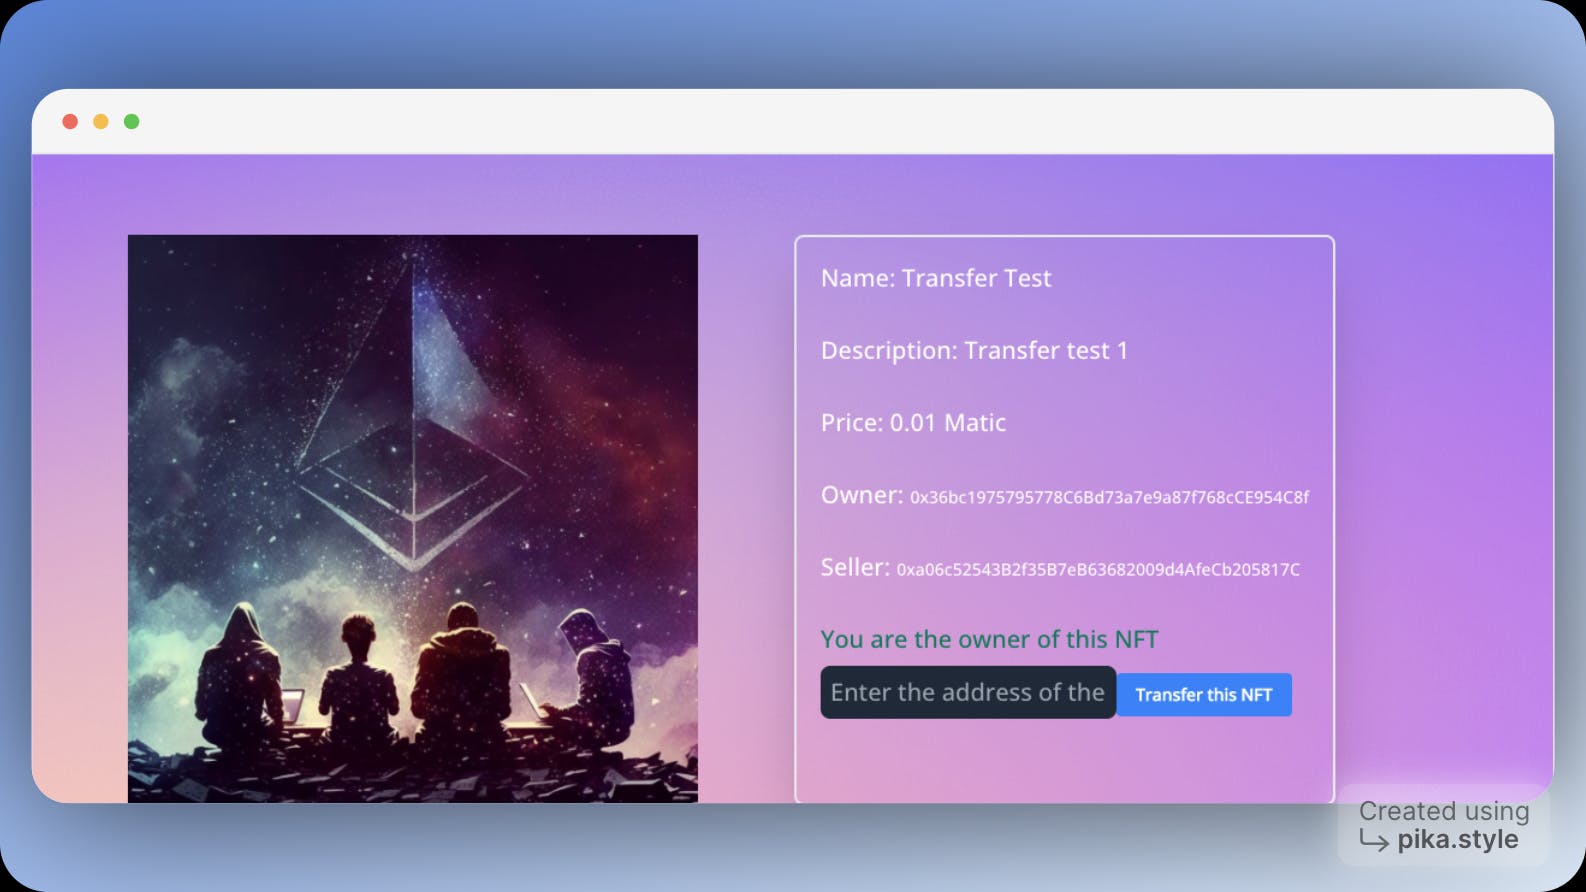
The component we return displays the details about the NFT using the specific tokenId. The exciting feature here is that the interface shows the "Transfer" button if the user is the owner or the seller of the NFT; otherwise, it displays the "Buy" button.
And after implementing everything, here's the result you'll get:
Now, restarting the whole DApp by closing the tab and terminal will work seamlessly with the UX your user wants.
Summary
Wohoo!!! You just created an NFT marketplace with far better UX than the current ones.
You can check out the complete code here:
Paper Provide several solutions to improve UX, like payment through credit cards.
Learn more about Paper's SDK here
Connect with me on Lens🌿[@megabyte0x.lens] or Twitter[@megabyte0x].
Also, feel free to share your learnings and reach out to me if you've any doubts or questions.
Happy building! 🛠️
WAGMI🚀